Moodle Accessibility
In a nutshell
The choice of Moodle as a central platform for presenting and distributing your learning content is explicitly recommended regarding accessibility for people with disabilities of various kinds. For many students, gathering learning content from various sources is itself a first major hurdle. Moodle as an e-learning platform comes with everything it takes to ensure good accessibility in the sense of universal design. But even in Moodle, many accessibility aspects of content preparation must be taken into account:
- Structure your content using headings
- Alternative texts for images
- Table headings for data tables
- Format listings as lists
- Self-explanatory link texts
- Use of colours and contrasts
- Video and audio content
Many aspects relate to the machine readability of content to ensure compatibility with assistive technologies such as screen readers or speech input software.
Although Moodle, as claimed above, has everything in place as an e-learning platform to ensure good accessibility, there are two things in particular that need to be considered:
- HTML vs. PDFs: Moodle unfolds its greatest potential when content is presented directly as web content (HTML) (see Moodle course on TeachingLab).
- PDFs: If, contrary to this recommendation, Moodle is primarily used to make documents available for download in other formats, care should be taken to ensure that these documents are themselves prepared in an accessible manner (see Accessible PDFs).
- Be careful with Moodle plugins such as H5P and other third party Moodle components and modules.
Caution with Moodle plugins and components
Moodle promises to create the conditions for producing accessible content with its core components. The next section describes the most important aspects to consider.
Caution is advised with the countless additional modules and components available, such as H5P quizzes, video players and many more.
We are currently gathering experience on the accessibility of frequently used components and plug-ins and keeping it up to date. Please help us!
Are you currently revising your Moodle content or creating a new course in Moodle? Contact us at anton.bolfing@let.ethz.ch for an assessment of the components/modules you plan to use. We will be happy to help develop optimal configurations or show alternative ways and benefit from your experience.
Accessible HTML content in Moodle
In this main part of this article, you will find step-by-step instructions on how to implement the essential aspects of accessible HTML content in Moodle.
Heading structure
For complex digital content, it is also important in Moodle that accessible content is embedded in a clear and clean heading structure that organises the content hierarchically. Particular attention should be payed to ensure that the headings describe the subsequent content briefly and concisely in each case, and that the hierarchical structure is reflected in the heading levels chosen. In correctly nested heading structures, no heading levels are skipped.

This is not always easy to do in Moodle. Firstly, because Moodle sets heading (levels) for certain components on its own (as an example this is shown in the above figure in the case of the "Completion Process" component on level 5 instead of level 2). Secondly, there are only three heading levels to choose from in the Moodle visual editor: Heading (large), Heading (medium) and Heading (small).
Headings in the Moodle editor
The Moodle visual editor allows three levels of headings within a component: Large, medium and small. In our example (previous figure), the overall course is correctly titled with a heading level 1 "Digital Accessibility @ ETHZ" and the content of the first chapter is titled "3.1. Info & Semantics - Explicit semantics and semantic structure" at heading level 2. Accordingly, the three heading templates "Heading (large)", "Heading (medium)" and "Heading (small)" represent heading levels 3, 4 and 5.

Assign headings
Select the text you want to tag as a heading of a particular level, click on the drop-down item with the A symbol and select “Heading (large)” for level 3, “Heading (medium)” for level 4 or “Heading (small)” for level 5.
Checking the Heading Structure
As the overall structure of the headings in Moodle quickly becomes messy, we recommend using the h123 bookmarklet by Hinderling Volkart to check (note: in the role of "student" in Modle) and revise the heading structure before publishing your course.
- external page h123 Bookmarket
The bookmarklet can be easily dragged into the bookmarks bar of most browsers and used for any web content. Detailed instructions can be found in our TeachingLab Moodle course.
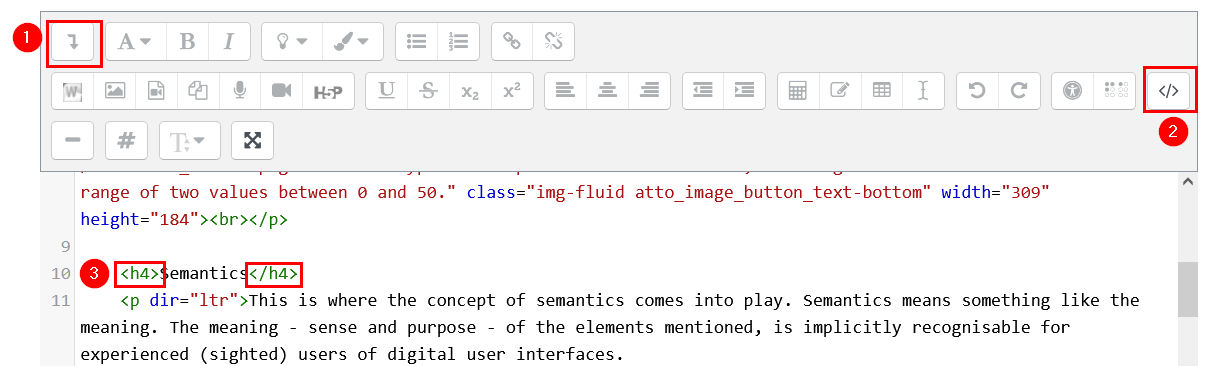
HTML view in the Moodle editor
It is often easier and clearer to edit semantic tags (such as h1-h6) manually in the HTML view of the editor. To do so, expand the editor options by clicking on the first icon (show/hide advanced buttons) in the bar and then activate the HTML view of the editor by clicking on the HTML icon (</>).
Alternative texts
When images are uploaded and embedded in Moodle, Moodle explicitly requires an alternative text: "Describe this image for someone who cannot see it" (item 1 in the figure below). If you try to save the image without entering an alternative text, an error message appears: "An image must have a description, unless it is marked as decorative only." (2).

The image can only be saved if you either enter an alternative text or declare the image as decorative using the checkbox "This image is decorative only" (3).
Write sensible, meaningful alternative texts. In general, the following applies to:
- Simple graphics: a concise description of what you want to convey with the particular image. In the present case, for example, this could be "Logos: HTML, CSS, JS".
- Linked graphics: Describe the link target
- Decorative graphics: Checkbox "This image is decorative only" (3)
- Complex graphics: If the 125 characters (4) are not sufficient for a precise description, refer in the alternative text to the place in the content where a detailed description of the content can be found.
Under Alternative texts and text alternatives you will find detailed guidance helping you decide what a useful text alternative in a specific case might be, as well as a few best-practice examples of text alternatives for complex graphics from learning materials at ETH.
Tables and lists
Tables
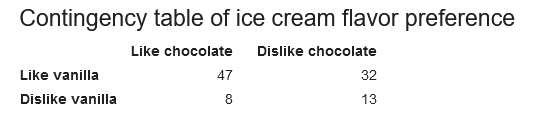
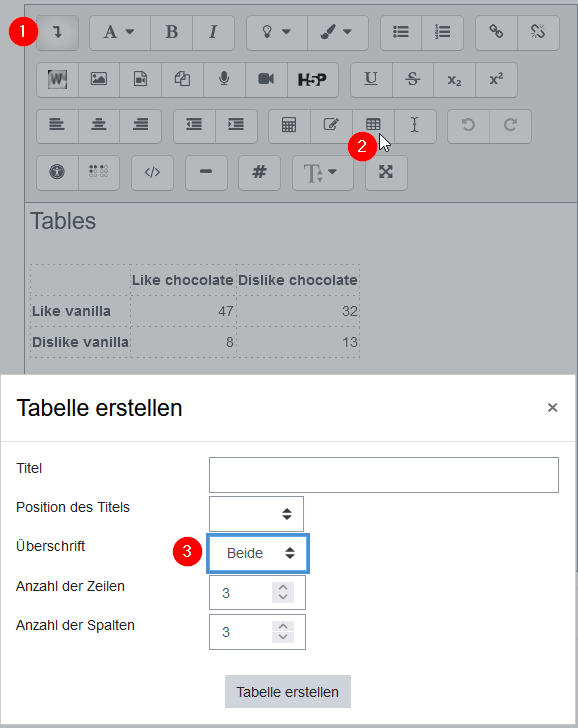
When data tables are used correctly, in most cases they represent data that is classified according to at least two dimensions. In table presentation, this classification is then reflected as columns and rows. For this reason, accessible tables usually must be implemented with both column and row headings.
Moodle's visual table editor comes with the ability to tag tables with table headings on columns, on rows or on both dimensions. Choose both from the drop-down menu (3).
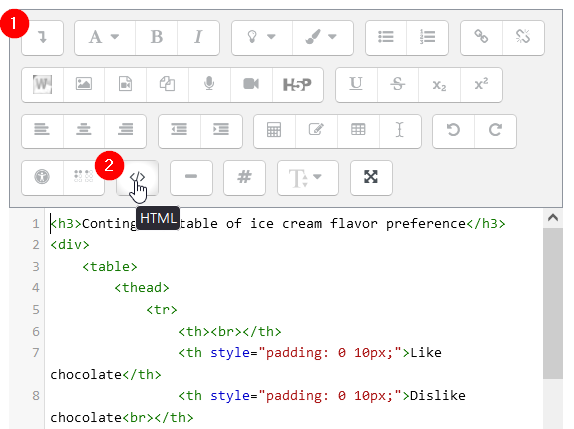
Note: The first columns or rows do not always contain the most relevant information (e.g. running numbers in the first column). HTML therefore allows table headings (<th> elements) in cells other than the first column/row, or even multiple <th>s. Use the HTML view of the editor in these cases, or also to prettify the table visually.
A detailed guide to accessible tables, even very complex ones, can be found on the page "external page Benimmregeln für Datentabellen" (german only).
Lists
Accessible lists of items of any kind must always be explicitly marked as lists. Moodle does not automatically format lists as lists, even if they are preceded by a minus or an asterisk sign. Use the formatting options of the Moodle editor for this purpose.
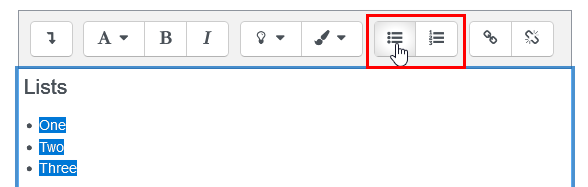
Write the list items, select them, and choose "Ordered List" or "Unordered List" from the Moodle Editor.
Link texts
Accessible link texts are self-explanatory in terms of the link's target. Therefore, avoid link texts such as "here" or "next", especially if several links on the page are so designated.
Instead, for each link, briefly consider what a precise yet short description might be.
Other important aspects of accessibility to consider
As with all digital formats and technologies, the following general aspects need to be considered in Moodle:
- PDF Accessibility
- Alt texts and good text alternatives
- Handling colours and contrasts (see Accessibility Basics)
- Captions and integrated descriptions in videos (see Accessibility Basics)
Deepen your knowledge in one of our TeachingLab workshops
The skillful use of Moodle, and the familiarisation with the measures described above to ensure good accessibility of your content, require practice.
We recommend one of our TeachingLab workshops or a tailor-made workshop for your current questions.
- TeachingLab Digitale Accessibility @ ETHZ
- Accessibility Basics (background, why and wherefore)
- Tailor-made workshops for your team? Contact us at anton.bolfing@let.ethz.ch